Sunday, September 9, 2012

Strawberry Ladybugs! Great for Valentines

Brace yourself for the post with the most pictures eva'! It will hog up all your bandwidth! It will break the interwebs! The planet will implode! Took it too far?


Love Bugs!

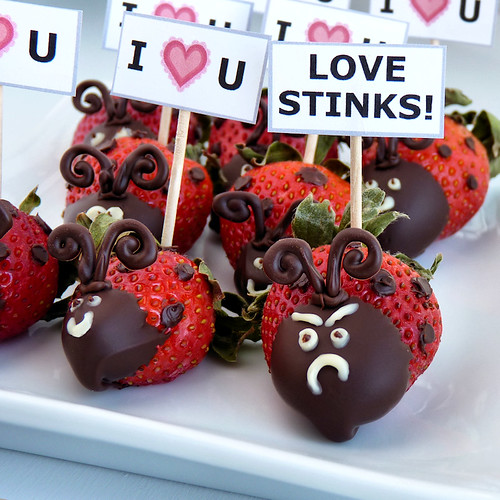
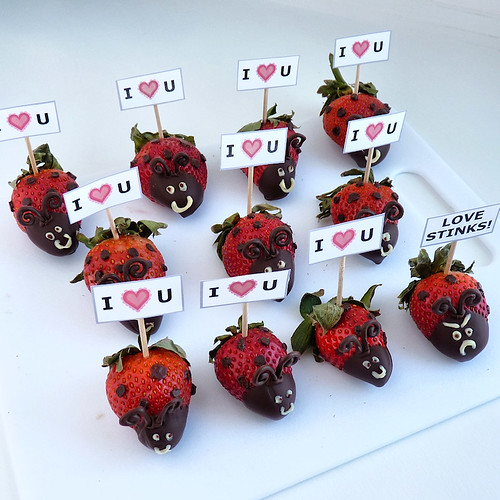
The Strawberry Love Bugs are back! Remember the ones I made in 2009? These are pretty much the same, except that I printed out their little signs instead of making them by hand.


Which one are you teaming up with?

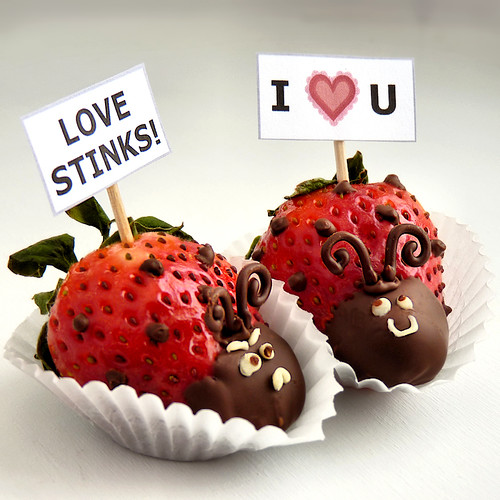
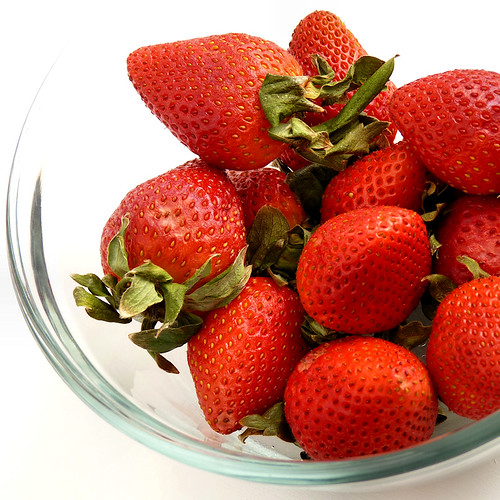
Which one are you teaming up with for Vegantine's Day? I *heart* You or Love Stinks? If you've been reading my blog for a while, then you probably know that I always like to throw in a Mr. Grumpy Pants along with the happy faces, you know, for balance. Wanna make some? First you're going to need to wash and pat dry about a pound of strawberries...


Mmmm... strawberries

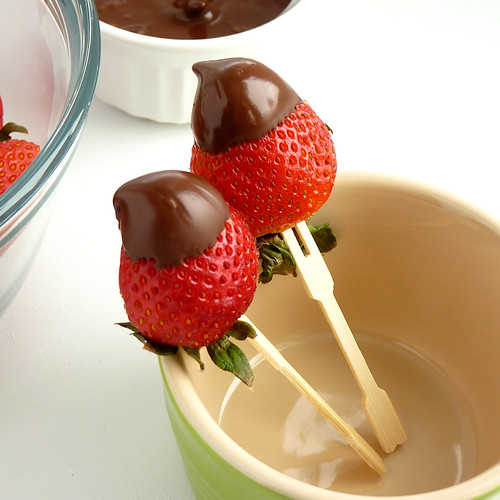
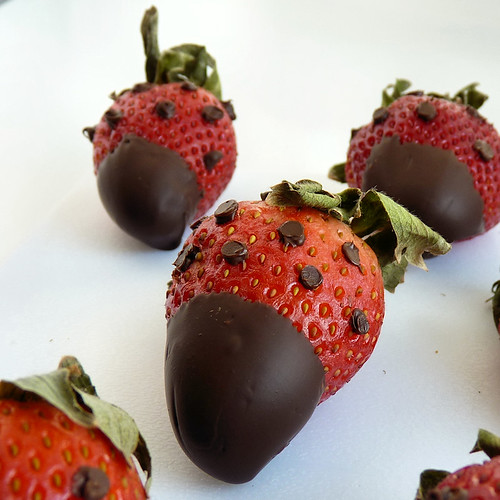
Then you're going to need about two ounces of melted semi-sweet chocolate chips. I melt mine in the microwave at half power, stirring every 45 seconds. If you're a proper double-boiler person, then go for it. Dip the tips of the strawberries in the melted chocolate...


'Dipping

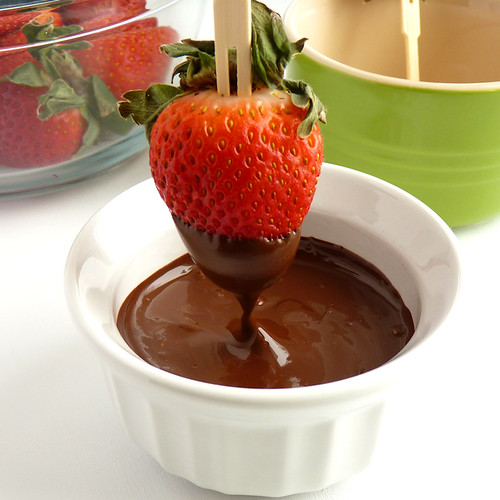
I use bamboo picks to dip them, but you can use regular toothpicks too. Place the strawberries upside down inside a small ramekin or other fairly shallow container...


Letting the chocolate set


A bouquet of bugs-to-be!
Purdy strawberry bouquets!

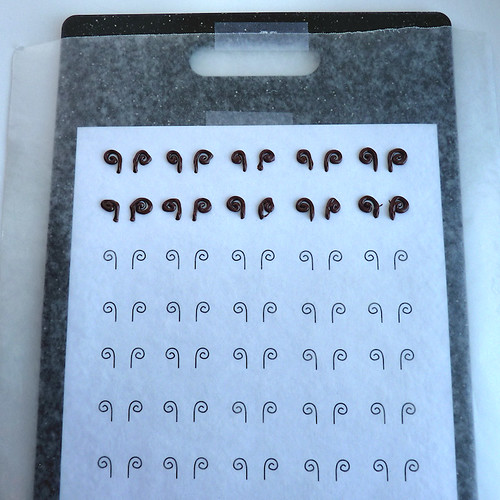
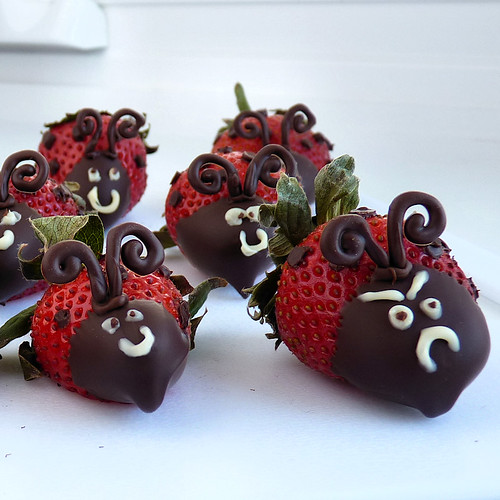
Refrigerate the strawberries while you make the antennae. The antennae are totally optional, and I'm not going to lie to you, they can be a pain in the gluteus maximus. If you want to make them, check if your melted chocolate needs a few more seconds in the microwave to soften it up. Mine did. Then transfer it to a small ziploc and cut a small tip off one of the corners. You can print out my antennae pattern if you would like to use it, then tape it to a chopping board and tape a piece of wax paper on top of the pattern paper. When you're ready, use your chocolate-loaded ziploc bag to trace the little swirly antennae. If you have no idea how to do that, check out my chocolate spider-legs video that might paint a clearer picture.


Making antennae

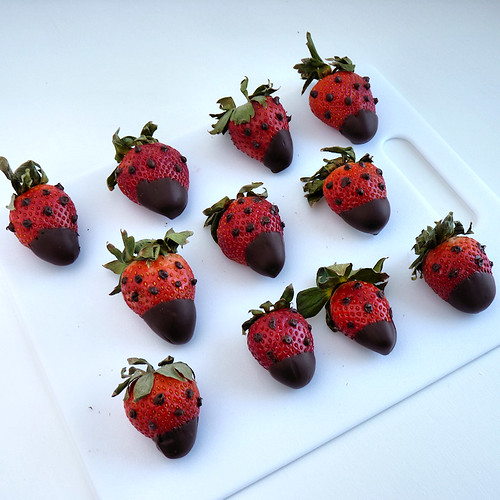
Place the chopping board in the freezer and let's make some buggy dots! Use the same ziploc to drop little dots all over the tops of the strawberries, except for the heads, of course.


Dotty!

This next step is also optional, but I like to flatten the chocolate dots with a hot (dry!) knife.


Hot knife

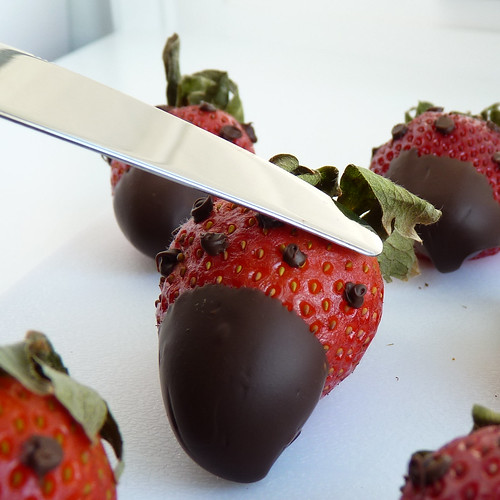
Totally optional, and maybe even unnecessary. But I like them better flat...


Flattened dots

Now it's time to draw some eyes and mouth on'em. I used melted vegan white chocolate chips, but you can also make them with a very stiff powdered sugar and water icing. Use another ziploc to pipe the melted chocolate/sugar icing and draw their little faces. Mr. Grumpy Pants needs a pair of grumpy eyebrows.


Eyes and mouths - white chocolate

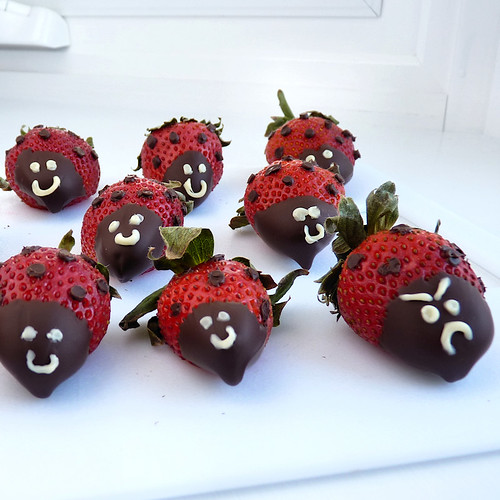
Now pipe a little drop of the semi-sweet chocolate in the center (or not!) of each eye. Or you can dip a toothpick into the melted chocolate and then "poke" the center of each eye. Also, this would be a good time to attach the antennae. Use a generous drop of melted chocolate as glue, on top of their heads, and then quickly attach the antennae. If your hands are too hot and the antennae melt in your hands, you can always use some kitchen-only tweezers to grab them.


Eyes - chocolate dots

Now they need their signs! You can make your own or you can print mine out if you want. I *heart* You signs are here, and Love Stinks signs are here. Your choice! Just cut out the signs and tape a toothpick to the back of each sign.


Sign

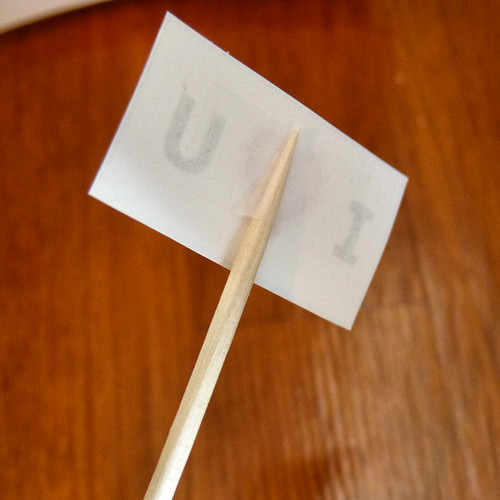
Insert the signs to the top/back of each Love Bug and you're done!


All signed up

At this point I realized that the leaves were looking a little dry and ugleh, so I trimmed them...


An army of Love Bugs! Ruuuunnnn!


The bunny hop? The buggy hop?
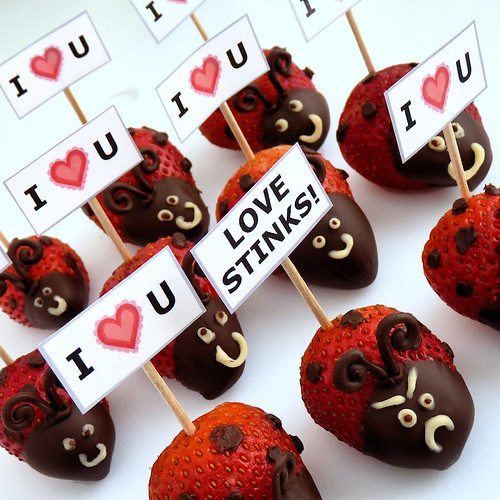
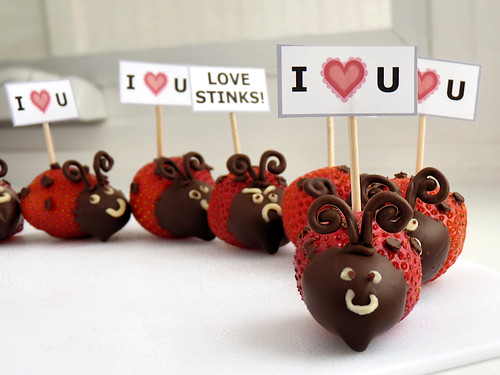
A nice little row of bugs, coming to steal your heart!


I *heart* U on a cupcake! :)
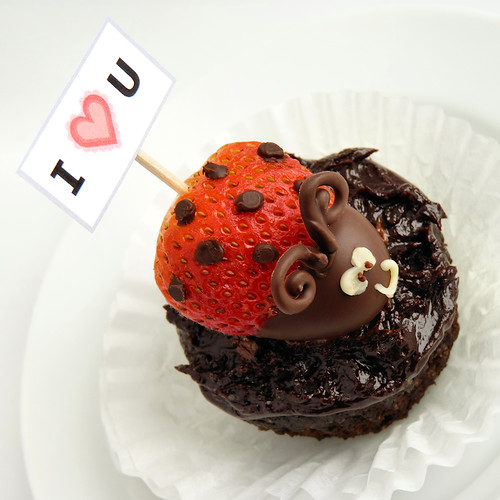
They also make cute cupcake toppers!


Love Stinks on a cupcake!
Even Mr. Grumpy Pants!
 
For more great ideas click here

Vegan Jack O Squash

Vegan Jack-o-Squash Recipe
Halloween is almost here and it's time to get our creepy on! My favorite way to celebrate the spooky season is with lots of themed foods. Desserts are easy to figure out, especially with all the candy that comes along with Halloween, but there's no reason why savory foods can't be as fun as the sweet goodies! These easy to carve and very festive Jack-O'-Lantern acorn squashes are filled with nutritious quinoa and a hint of eeevil!
 
Quinoa Stuffed Mini Jack-O'-Lanterns or Halloweegan Peppers

Prepare the squashes:
  • 2 gold acorn squashes
  • olive oil
  • salt
  • black pepper
If you're going to bake them in a conventional oven, preheat it to 375ºF.

Slice off the bottom tip of the squashes to create a flat base. Cut off the tops and use a spoon to remove the seeds. Save the tops for later!

Use a pencil to draw the faces on the squashes, and use a small serrated knife to carve out the faces. Luckily, carving a small acorn squash is easier than carving a big pumpkin!

Brush a little olive oil all over the inside of the squashes and lightly sprinkle them with salt and black pepper. At this point you can choose to bake them in a conventional oven for an hour or until soft, or you can cook them in the microwave like I did. Place the squashes in a microwave safe bowl, add about 1/2 cup of water and microwave for 5 to 8 minutes or until soft.

In the meantime, make the quinoa stuffing:
  • 1 tbsp olive oil
  • 1/2 cup onion, chopped
  • 1/2 cup mushrooms, chopped
  • 1 garlic clove, minced
  • 1 tbsp fresh parsley, minced
  • 1/4 tsp salt
  • black pepper to taste
  • 1/2 cup uncooked quinoa
  • 2 tablespoons nutritional yeast
  • 1 cup vegetable broth
Heat the oil in a medium saucepan over medium heat. Add the onions and saute for about five minutes or until soft. Stir in the mushrooms and saute two more minutes. Stir in the garlic and saute for just about 30 seconds.

Add the parsley salt, black pepper, quinoa, and vegetable broth. Reduce heat to low and simmer for 15 to 18 minutes or until all the water is absorbed and the quinoa is soft and fluffy. If the quinoa is still crunchy you can add more broth and simmer it for a few more minutes.

Spoon the quinoa stuffing into the acorn squashes and cover them with the reserved squash tops. Reheat the finished dish, if necessary, and serve.

For Tiny Appetites: You can make those mini pumpkins instead of the bigger acorn squashes. You can stuff 6 to 8 mini pumpkins with this recipe, depending on their size.

Halloweegan Peppers: You can also stuff a carved orange bell pepper. Carve, stuff, and bake in a covered casserole dish at 350 degrees F. for 25 to 30 minutes.
Vegan Jack-o-Squash Recipe
Yields 2 servings

For more awesome Vegan Ideas...click here!

Saturday, September 8, 2012

Tortilla Crisps


Our 4-ingredient recipe for crunchy Tortilla Crisps will make you a hero to your kids. It's okay if you snack on them too...'cause they're a bit healthier and beat any bagged snack by a mile!     
What You'll Need:
  • 1/4 cup granulated sugar
  • 1 teaspoon ground cinnamon
  • Cooking spray
  • 8 (10-inch) flour tortillas
Instructions
  1. Preheat oven to 425 degrees F. Coat 2 rimmed baking sheets with cooking spray.
  2. In a shallow dish, combine sugar and cinnamon; mix well and set aside.
  3. Place 2 tortillas on a cutting board and use your favorite cookie cutter shapes to cut shapes from the tortillas. Spray both sides of the tortilla pieces with cooking spray and sprinkle with the sugar and cinnamon mixture. Place on prepared baking sheets.
  4. Bake 6 to 8 minutes, or until golden. Repeat with remaining tortillas. Allow to cool then store in an airtight container.
Notes:
  • Applesauce makes a great "dip" for these chips!

Pumpkin Cheese Ball


Your Halloween party is sure to shape up to be the talk of the neighborhood when you serve our adorable Pumpkin Cheese Ball to your ghoulish guests. This pumpkin-shaped party appetizer will have everyone wanting to "haunt" you down for your recipe.

Serves: 10
Chilling Time: 20 min
What You'll Need:
  • 3 cups (12 ounces) finely shredded sharp Cheddar cheese
  • 2 (8-ounce) packages cream cheese, softened
  • 3 tablespoons sour cream
  • 1/2 teaspoon dry mustard
  • 1 tablespoon hot pepper sauce
  • 2 scallions (green onions), thinly sliced
  • 1 cup finely crushed cheese-flavored crackers
  • 2 gherkin pickles, for garnish
Instructions
  1. In a medium bowl, combine Cheddar cheese, cream cheese, sour cream, dry mustard, pepper sauce, and scallions; mix until well combined. Cover and chill for 20 to 30 minutes.
  2. Form cheese mixture into the shape of a pumpkin. Place cracker crumbs in a shallow dish. Roll cheese ball in crumbs, covering entire surface. Place on serving plate.
  3. Place one pickle on top to form pumpkin stem. Slice remaining pickle to decorate face (see photo). Serve immediately, or cover and chill.
Note
Serve with your favorite crackers or thin slices of French bread.

Onion Strings


This crunchy 5-ingredient recipe for easy homemade Onion Strings will make you feel like a restaurant chef. Whether you make 'em for tasty nibbling or as a main dish topper, they're always a hit.

Serves: 3
Cooking Time:7 min
What You'll Need:
  • 1 large onion, thinly sliced
  • 1 cup all-purpose flour
  • 1 1/2 teaspoons salt
  • 1/2 teaspoon white pepper
  • 1 cup vegetable oil
Instructions
  1. Separate onion slices into rings.
  2. In a medium bowl, combine flour, salt, and pepper; mix well.
  3. In a large skillet, heat oil over medium-high heat. Place onion rings in flour; coat well then carefully place in hot oil.
  4. Fry onions 6 to 8 minutes, until golden. Drain on a paper towel-lined plate, and serve immediately.
Note
These Onion Strings are yummy as is, but you can sprinkle them with salt before serving, if you'd like.

Homemade Philly Soft Pretzels


Bake up a batch of your very own Soft Pretzels, just like the ones street vendors in Philadelphia and other big cities sell! Put out some mustard for dipping and enjoy the tasty experience!

Serves: 4
Baking Time:15 min
What You'll Need:
  • 1 pound frozen bread dough, thawed
  • 1 egg white
  • 1 tablespoon water
  • 1 teaspoon (coarse) salt (see Note)
Instructions
  1. Coat 2 large rimmed baking sheets with nonstick cooking spray.
  2. Cut dough into four equal pieces. On a lightly floured surface, roll each piece into a 24-inch rope; form into a pretzel shape and place on baking sheets.
  3. In a small bowl, beat together egg white and water; brush over top of each pretzel. Sprinkle evenly with kosher salt. Loosely cover with plastic wrap and set aside in a warm place to rise for 15 minutes. Preheat oven to 350 degrees F.
  4. Remove plastic wrap and bake pretzels 15 to 17 minutes, or until golden. Serve warm.
Notes
For a little variety, top these with minced onion or garlic salt instead of coarse salt.

DID YOU KNOW…that more than half of the 400 million pounds of pretzels made annually in the United States are produced in Pennsylvania?

Fruit Roll Sushi


East meets West when Mr. Food takes armchair travelers to the Far East, where sushi reigns! His fun-filled kid-friendly dessert sushi will please the youngster and the young at heart!

Serves: 30
Preparation Time:10 min
What You'll Need:
  • 1 tablespoon butter
  • 12 marshmallows
  • 2 cups crispy toasted rice cereal
  • 4 (4-1/2-inch) square fruit roll-ups (1/2 ounce each)
  • 6 assorted licorice or fruit twist sticks, cut in half crosswise
Instructions
  1. In a medium saucepan, melt butter over low heat. Add marshmallows and stir until completely melted. Remove from heat and stir in cereal until completely coated.
  2. On a flat surface, unroll fruit roll-ups. Spread equal amounts of cereal mixture over each roll-up, covering entire surface and packing mixture flat.
  3. Place 3 different-colored licorice or fruit twists in center of each and roll tightly into a log, sealing where edges meet. Squeeze rolls gently to secure. Trim ends and slice with a serrated knife into 1/2-inch pieces. Serve, or store in an airtight container until ready to serve.
Notes
Tip: To give your snacks the most variety and color, use different-colored and -flavored fruit roll-ups and licorice or fruit twist sticks. And if you can't find different-colored licorice, you can even use gummy worms.

Crispy Jack O' Lanterns


Dress up your crispy rice balls with spooky faces! This great Halloween recipe for Crispy Jack O' Lanterns is sure to bring out the kid in every member of your household!

Serves: 8
Preparation Time:10 min
What You'll Need:
  • 1 (10-ounce) package marshmallows
  • 3 tablespoons butter
  • Yellow and red food colors
  • 6 cups crispy rice cereal
  • 8 small Tootsie Rolls, unwrapped
  • Assorted candies and cake decorating gels
Instructions
  1. Coat a rimmed baking sheet with cooking spray.
  2. In a large nonstick pot, combine marshmallows and butter over medium-low heat and cook for 5 minutes, or until melted and smooth. Remove pot from heat and add one drop at a time each of red and yellow food color until mixture reaches desired orange hue. Add cereal; stir until combined.
  3. Coat your hands with cooking spray then shape cereal mixture into 8 same-sized balls; place on prepared baking sheet and let stand for 15 minutes.
  4. Press a Tootsie Roll into the top of each cereal ball to form stems. Using candies and/or decorating gel, make a jack-o'-lantern face on each crispy rice ball. Serve immediately, or cover loosely until ready to serve.

Chili Dog Puffs


If you're expecting a crowd over to watch the game and want them to feel like they're right in the ballpark, here's how. We bet you'll almost hear the vendors shouting, "Chili dogs here! Get your chili dogs here!"

Makes: 16 puffs
Cooking Time:10 min
What You'll Need:
  • 1 (8-ounce) package refrigerated crescent rolls (8 rolls)
  • 1/2 cup (from a 15-ounce can) canned chili
  • 2 hot dogs, each sliced into 8 equal pieces
Instructions
  1. Preheat oven to 400 degrees F.
  2. Separate crescent rolls into 8 triangles. Cut each triangle in half, forming 16 triangles. Spread out each triangle slightly and place 1 teaspoon chili and 1 piece of hot dog in the middle of each.
  3. Bring all sides of the crescent rolls together, close completely, and place seam-side down on an ungreased baking sheet.
  4. Bake 10 to 12 minutes, or until browned. Serve immediately.
Note
Serve your Chili Dog Puffs with spicy brown mustard.

Baked Spinach and Artichoke Dip


Great for Super Bowl! Check out our lightened version of the classic appetizer, Spinach and Artichoke Dip. Bet you can't tell the difference!

Makes: 2 3/4 cups
Preparation Time:8 min
Cooking Time:25 min
What You'll Need:
  • 2 (6-ounce) packages fresh baby spinach
  • 1 tablespoon butter
  • 1 (8-ounce) package 1/3-less-fat cream cheese
  • 1 garlic clove, chopped
  • 1 (14-ounce) can artichoke hearts, drained and chopped
  • 1/2 cup light sour cream
  • 1/2 cup (2 ounces) shredded part-skim mozzarella cheese, divided
Instructions
  1. In a large microwave-safe bowl, microwave spinach on HIGH 3 minutes, or until wilted. Drain spinach well, pressing between paper towels, then chop.
  2. Preheat oven to 350 degrees F.
  3. In a nonstick skillet, melt butter over medium-high heat. Add cream cheese and garlic; cook 3 to 4 minutes, stirring constantly, until cream cheese melts. Fold in spinach, artichokes, sour cream, and 1/4 cup mozzarella cheese; stir until cheese melts.
  4. Transfer mixture to a 1-quart shallow baking dish. Sprinkle with remaining mozzarella cheese.
  5. Bake 15 minutes or until hot and bubbly. Serve immediately with fresh pita wedges or baked pita chips.
Nutritional Information
Per 1/4-cup serving (not including dippers): calories 113 (53 percent from fat); fat 7g (sat 4.7g); protein 5.5g; carbohydrate 8.5g; fiber 2.4g; cholesterol 24mg; iron 1mg; sodium 340mg; calcium 1mg

Thursday, September 6, 2012

Cheesecake Filled Cupcakes


Wanna raise some eyebrows? Cheesecake Filled Cupcakes combine everybody's favorites into a cheesecake-filled chocolate cake. There's nothing better!

Makes: 30 cupcakes
What You'll Need:
  • 1 (18.25-ounce) package chocolate cake mix
  • 1 (8-ounce) package cream cheese, softened
  • 1/3 cup sugar
  • 1 egg
  • 6 ounces chocolate chips
Instructions
  1. Preheat oven to 350 degrees F. Line muffin pans with paper baking cups.
  2. Make cake mix according to package directions. Spoon batter into muffin pans, filling each cup about 2/3 full.
  3. In a large bowl, beat cream cheese and sugar until light and fluffy. Beat in the egg then stir in the chips.
  4. Drop 1 teaspoon cheese mixture onto each cupcake. Bake as cake mix package directs.

Church Windows


Dessert is usually sweet, but how often is it this pretty? Use multicolored marshmallows to create a sweet that swirls with color!

Serves: 48
 
What You'll Need:
  • 1/2 cup (1 stick) butter, softened
  • 1 package (12 ounces) semisweet chocolate chips
  • 1 teaspoon vanilla extract
  • 1 cup chopped walnuts
  • 1 package (10-1/2 ounces) multicolored miniature marshmallows
  • 1 cup sweetened flaked coconut, divided
Instructions
  1. In a large saucepan, melt the butter and chocolate chips over low heat, stirring constantly. Remove the saucepan from the heat and stir in the vanilla and walnuts. Cool the mixture for about 15 minutes, until cool but not to the point of hardening.- Fold in the marshmallows and stir until well coated.
  2. Spoon half of the mixture lengthwise down the center of an 18-inch piece of waxed paper. Shape into a 12 x 2" log and place at one edge of the waxed paper. Sprinkle 1/2 cup coconut over the remainder of the waxed paper.
  3. Roll the log over the coconut, evenly coating the outside of the entire log. Wrap the log tightly in the waxed paper, folding the ends snugly. Repeat with the other half of the marshmallow mixture and the remaining 1/2 cup coconut.- Chill until firm, at least 2 hours or overnight. Unwrap each log and cut into 1/2-inch slices.
Notes
Yields about 4 dozen cookies.

Autumn Pastry Leaves


It doesn’t matter if you start off with a store-bought frozen pie or a homemade one, you can make it unique by dressing it up with edible autumn pastry leaves. They’re simple yet they’ll make everybody think you’re a fancy pastry chef!

Yields: 12 leaves
Cooking Time: 5 min
What You'll Need:
  • 1 rolled refrigerated pie crust (from a 15-ounce package)
  • 1 egg
  • 2 tablespoons water
Instructions
  1. Preheat oven to 350 degrees F. Using a stencil and sharp knife, or cookie cutter, cut out leaf shapes from pie crust. Using a knife, score lines on "leaf" cutouts to look like veins on real leaves, being sure not to cut all the way through the crust. Place cutouts on a cookie sheet, or drape over some bunched-up aluminum foil to create a natural curve during baking.
  2. In a small bowl, beat egg and water until well combined. Brush cutouts with egg wash then bake for 3 to 5 minutes, until golden.
Notes
Use these delicate edible leaves to decorate autumn cheese platters, and your favorite cakes and pies (homemade or store-bought).

Apple Harvest Pockets


With our hectic lifestyles, we always seem to be eating on the run. That's why these apple harvest pockets work so well. Not only are they portable, but they're packed with good-for-us apples and cinnamon.

Serves: 8
What You'll Need:
  • 1 (15-ounce) box refrigerated pie crusts, softened as directed on package (see Note)
  • 2 cups peeled, diced apples (see Option)
  • 1/3 cup sugar
  • 1 tablespoon all-purpose flour
  • 1 1/2 teaspoons ground cinnamon
  • Caramel topping (optional)
Instructions
  1. Preheat the oven to 400 degrees F.
  2. Unroll the pie crusts and place on a cutting board. Cut each crust into quarters, making 8 wedges total.
  3. In a large bowl, combine the apples, sugar, flour, and cinnamon; mix well.
  4. Spoon 1/3 cup of the apple mixture on one half of each wedge. Fold the wedge over the filling. With a fork, crimp the edges to seal the dough. Place on an ungreased baking sheet. Cut several small slits in the top of each to allow steam to escape.
  5. Bake for 15 to 20 minutes, or until light golden. Serve warm or cool as is, or drizzle with caramel topping and serve with ice cream.
Option
A 21-ounce can of apple pie filling can be used in place of the apples, sugar, flour, and cinnamon.

Black Forest Ice Cream Cake

Turn your mealtime into a cultured affair with the classic German specialty: Black Forest Cake. These easy cake recipes pay homage to this European dessert through layers upon layers of chocolate, whipped cream, and cherries. What's not to love? Dessert decadence is only a recipe away!

Black Forest Cake Recipe Favorites

Serves: 12
Freezing Time:3 hr
What You'll Need:
  • 1 (19.6-ounce) frozen chocolate layer cake, cut into 14 even slices (Do not thaw)
  • 1 quart black cherry ice cream, slightly softened
  • 1 (16-ounce) jar hot fudge sauce, divided, reserving 2 tablespoons for drizzling
  • 1 (8-ounce) container frozen whipped topping, thawed
  • 12 maraschino or fresh cherries
Instructions
  1. Place half the cake slices in an 8- x 8-inch baking dish, arranging to fit tightly. Spread ice cream evenly over cake. Spoon half the hot fudge sauce over ice cream and top with remaining cake slices. Spoon remaining hot fudge sauce over cake then top with whipped topping.
  2. Cover with plastic wrap and freeze 3 to 4 hours, or overnight.
  3. Remove from freezer 5 to 10 minutes before serving. Warm reserved hot fudge sauce, drizzle over cake, and garnish with cherries.
Note
  • Frozen chocolate cakes may vary in size, depending upon brand, but they'll all work just fine for this delicious treat.

Adorable Fork Pops!


Fork Pops

This “couldn’t-be-easier" version of trendy cake pops was shared with us by authors, Karen Tack and Alan Richardson, of the “Hello, Cupcake” cookbook series. Try them, and you’ll find that whimsical Fork Pops taste as good as they look!

Makes: 18 cake pops
 
What You'll Need:
  • 1 (16-ounce) store-bought frozen pound cake, thawed
  • 18 plastic forks
  • 1 (16-ounce) can vanilla frosting
  • Assorted food colors
  • Assorted candy for decorating
Instructions
  1. Place pound cake on work surface. Trim to straighten ends then cut into 9 1-inch-thick slices. Cut two circles from each slice, using a 2-inch round cookie cutter or the rim of a small glass. Repeat with remaining slices to make 18 circles.
  2. Line a baking sheet with waxed paper. Carefully insert tines of a plastic fork into one side of each cake circle and place them on baking sheet. Freeze 15 minutes.
  3. Place frosting in a microwaveable bowl. Microwave, stopping to stir frequently, until it has the texture of lightly whipped cream, about 10 seconds. Remove cake pops from freezer. Dip each pop in melted frosting to cover, allowing excess frosting to drip back into bowl, then return to baking sheet. Refrigerate until frosting is set, about 20 minutes.
  4. Using assorted candies, food colors, (and your imagination), decorate any way you like.
Notes
Here are some great decorating ideas to get you started:
  • Divide the frosting into separate microwaveable bowls and tint with different food colors to make different color pops.
  • Use assorted small candies to decorate the pops.
  • Doughnut holes make great sports balls which can be decorated according to the sport.
  • Rice cereal treats can be shaped into cubes, dipped in frosting, and decorated with mini M & M’s to make dice.
  • Don’t throw out the pound cake scraps. Use them to make a layered dessert like a trifle!
 
OOH ITS SO GOOD!